|
09.03.09
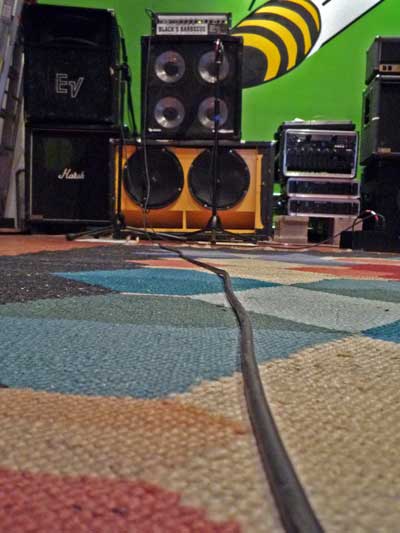
Element 3 - Bass, direct
Nearly there, friend. Nearly there.
There are two main (and one lesser) expected effects that we can expect to hear when figuring out where to place these microphones:
1. Proximity Effect - Each of the two microphones that we've ended up using is a directional microphone, which means that we need to consider the proximity effect. We'll oversimplify things by saying that the proximity effect's main thing is to increase the relative level of bass the microphone picks up the closer it is to the sound source. So, we can think that a good mic on a good sounding source that seems to boomy may need to be moved back a bit. On the other hand, something that sounds weak in the same situation may be improved by moving the mic closer to the source.
2. On/Off Center to Speaker Cone - Moving coil speakers like those in the cabinets we're miking almost always sound brightest right over the middle of the cone. As the mic moves away from this spot, it starts to sound smoother/duller.
These considerations should help us make sense of what we're hearing as we track the movement of the microphones. Do we feel like we want to emphasize the midrange of the signal a little more? Consider moving the mic to the side and back from the speaker cone. This will give a quieter signal (usually negligible when working with a loud amplifier) but may be closer to the tone we're looking for.
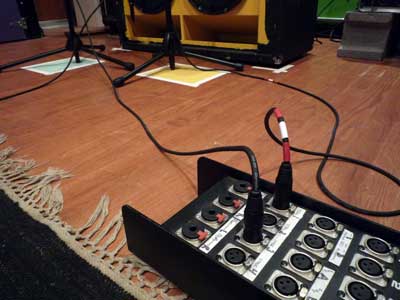
Remember above where we mentioned one lesser effect? Since we're going to be blending the sound of these two microphones with each other as well as the room microphones, we'll want to pay attention to the phase interactions. Again, this is a very involved subject that we pretty much sorta understand, but the key here is to flip the polarity on each of the channels of the direct mics to see which sounds better. Changing mic position has a big effect on this. We don't have one of those variable phase adjustment boxes but you can send us one and we promise we'll pay even that much more attention.
There are other things that we could cover here but we're trying to record an EP and not write a dissertation. So let's get to mic placement.
Microphone Placement
Here we do have literally an infinite number of choices that we could try to document, all by moving the microphone an infintesimal amount. To make some sense of this, we follow Justin's patented (not really) floor grid method.
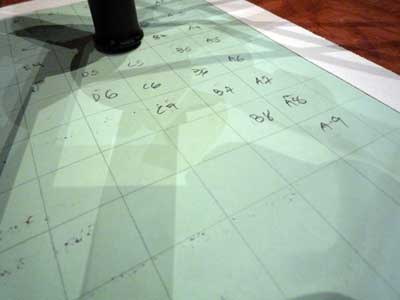
To wit: Since the mic stands we're using have a central pole that is held up by a tripod base, we can bring this pole's end almost down to the floor and have a good reference for the center of the mic stand. Next, we take a piece of paper and draw a grid on it of boxes - ours are 2 cm square. Label the boxes in rows and columns - A1, A2, A3 ... then B1, B2 ... you get the idea.
Now place the mic stand so that the mic is right up against the speaker grill. Drop to the floor and slide the piece of paper under the mic stand, arranging it to that A1 is directly underneath the stand's center pole. Tape it to the floor. Voila, you have a measurement grid for helping with placement. We like to take recording samples in different spots as the mic moves away from the grill right in front of the speaker's center cone.
So, for example, A2 is directly on-center and 2cm back from the grill. A3 is same but 4 cm back. D6 would be 6cm off-center and 10cm back from the cabinet. Makes sense, right?
CHOICES - (same for HI and LO)
We did two rounds of mic placement - rough and fine. For the rough one, we did six placement points from A1 to D5. This was quickly narrowed to about what sounded best - C3 (4 cm off-center and 4 cm away from the grill) in the case of the both cabinets. The fine test, then, moved just one box over, repeating the C3 box 1/2 way through the comparison cycle. (This will make more sense below). For the fine test, the mic placement spots were:
1. B3
2. C3
3. D3
4. C2
5. C3 (repeated)
6. C4
RESULTS
The cycle of choices here is split into six, noted by the number above.
Bass - 6 way comparison of placement for HF cabinet mic - solo.
Bass - 6 way comparison of placement for HF cabinet mic - solo.
Again, the HF cabinet shows much more difference - a lot more in this case. The LF choices seemed almost identical to one another. While I'm sure that increasing the range of the experiment would begin to make some differences obvious, I'm also pretty sure that what we're hearing here for the LF falls into the category of "fine, let's not worry any more about this."
As far as the HF cabinet is concerned, the treble of the sound does fall away as we move away from the speaker's center. I also notice that different frequencies are emphasized - it's again as though someone is boosting or cutting specific sliders on a graphic EQ as I listen to the comparison. Given that we've made choices so far to play up the HF content of this mic and preamp choice, I want to shy away from the center of the speaker cone - too close just sounds too buzzy. Row D gets me there, (choice 3), and we'll back just a touch away from the center of the choices.
DECISION AND NEXT STEPS
Final decision point for this bass playing at this volume through this amp at these settings through these cabinets in this room?
High Frequency Cabinet- EV RE20, amplified with the "stock" channel of a Sytek MPX-4A at 6 cm off-center and 4.5 cm from the cabinet grill. Polarity is reversed.
Low Frequency Cabinet - Josephson e22s, amplified with the "Burr Brown" channel of a Sytepk MPX-4A at 6 cm off-center and 6 cm from the cabinet grill. Polarity is normal.
That sounds like this:
Bass and Drums - beginning of song.
Up next - guitar.
|